Showing posts with label Jax. Show all posts

Friday, July 25, 2014

Jax - Robe

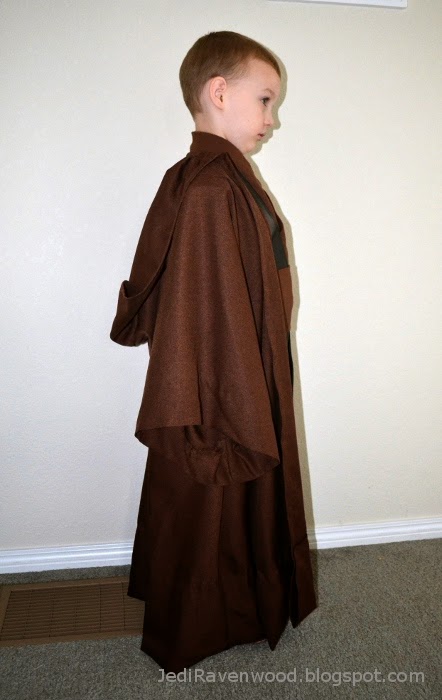
Behold! Jax's robe! (Imagine fanfare here.)


For the most part I followed SithariRog's robe tutorial. I only messed up in a few ways, but we will get to that later.

I realized that the sleeves were short enough that I could cut the robe main body as one piece by folding the fabric in quarters. I did this (more on that later) and I basically had a Jedi robe shaped poncho that needed side seams.

I stitched up the sides with French seams. It looks nicer and the material I chose really likes to shred at the edges. French seams = no loose threads to cut off in the future.

Next I cut the hood. (It is too big. I need to find a good hood-to-body ratio.) In the tutorial it says to pleat the hood and robe. I'm all for pleats, but it was late and I was being impatient so I gathered the bottom edge of the hood and sewed it to the neck of the robe body.


I sewed a strip of fabric over the main body/hood seam to cover the raw edges as recommended in the tutorials. I don't think I did it quite right, probably because I did it all on my machine. No hand stitching. I'm going to have to think on this and research some more before trying it again.

Remember how the robe was like one big poncho? At this point I cut open the front of the robe. I used a 1/2" rolled hem to finish the front edge. I did it all in one seam--up the front on one side, around the hood, and down the front on the other side. Clean. Neat. Done.

I had lots of material left over for the hems on the bottom edge and the sleeves. I decided to leave the excess material to let the robe out as Jax grows, instead of cutting it. Cutting would have been easier with those A-line curves, but it is done now and it's great.


A quick word on the hems for the sleeves and bottom edge. Please, for the love of all that it good and beautiful in this world, use a blind hem stitch for hems on curves. It really isn't that hard once you know how to do it. Look it up on YouTube. Having a blind hem foot for your machine makes it just that much easier.

Now it is later. I realized that the sleeves were short enough that I could cut the robe main body as one piece by folding the fabric in quarters. That wasn't the problem. I didn't move my fold so as to leave the most amount of excess at the bottom of the material. It was late and I was not being patient. My bad. This was all fine and well for the body, but left me insufficient material for the hood. (Face palm.)

I ended up sewing two rectangles together to make a large enough piece for the hood. If I had just moved the main body pattern and the fold up instead of cutting from the exact center of the fabric, it would not have been a problem and I could have sewed the hood from one, beautiful, uninterrupted piece of fabric. Live and learn. Live and learn.

What I learned:
  1. Cut from the edge of the fabric, no matter how much easier it is to cut from the middle.
  2. I need to learn how to cover the main body/hood seam and make it look good on the outside of the robe.
  3. Find some equations or something to get the sizing right--particularly of the hood.

Tuesday, July 22, 2014

Jax - Tunic, Tabards & Obi

Today we are covering Jax's outer tunic, tabards and obi.

(click to enlarge)

Tunic

The pattern for the tunic is a mash-up of the tutorial by SithariRog on the Rebel Legion forums, Simplicity pattern 3935 and Jax's measurements. 


It really isn't as hard as it sounds, especially if you have done any pattern garment sewing. I used the pattern for things like the curves for the armseye and collar. I traced the parts I wanted from the pattern on tissue paper. Then I measured Jax and used that to draw the straight lines on my tissue paper pattern. After that it was just cut and sew.


For what I am calling the facing (the strip of fabric around the collar and the open edges in the front), I did the same way as the inner tunic. I cut two 4" wide strips on the bias and sewed them end-to-end so that I had one really long strip. I cut it on the bias since bias cut fabrics love curves. They like to bend and conform unlike straight cut strips of fabric. I pressed the strip in half with wrong sides together. I sewed the raw edge of the strip to the raw edge of the body of the tunic. Unlike the undertunic, I skipped the topstitching since the facing was not trying to flip down on its own.

I used SithariRog's method of making a "skirt" for the bottom half of the tunic instead of letting the whole thing open in the front like a robe. However, I put slits in the sideseams of the "skirt" to ensure that he could run.


The front stays closed with a sew-on snap. In the future I would plan and add the snaps before finishing the garment to reinforce them with interfacing and make them invisible.

Tabards

I went off of SithariRog's tutorial for this, just scaled it down to Jax's measurements. 

(click to enlarge)
I topstitched around the entire perimeter of each tabard with a 1/4" seam allowance. I used black heavy-duty thread. Be sure to use a large topstitch needle or leather needle (size 100+) if you intend to do this. Using a smaller needle in your machine will shred this heavy weight thread.

Tabard back ends sewn to belt.
I also added my own little modification. To keep the spacing right in the front and hold it together, I made a little belt from a scrap left over from the tunic, stabilized with interfacing. I sewed the tabards onto the strap and velcroed it in the back. This little belt is hidden by the obi. For the adult costumes I think I am going to use this method, but close it with snaps instead.

Obi

I sewed a big rectangle 5"x26" and put a strip of velcro on the back.


As I mentioned in the last post, I have since talked to members of the Rebel Legion and they recommended staying away from velcro. Apparently it doesn't hold up well at over long periods of time and is a huge hassle to wash.

What I learned:
  1. Plan snaps before sewing so that they are hidden.
  2. Snap tabards to tunic at shoulder seam near the collar.
  3. Measure twice, sew once. (Somehow the tunic top, above the skirt, was four inches too long! I had to shorten it. But on the bright side, I didn't cut off the excess. I sewed a hidden pleat at the waist line. If I let it out, it will grow with him.)
  4. Fit top half of tunic on person, then draw line where the skirt should attach or it won't lay right. Three pieces of fabric (left front top, right front top, and skirt front of tunic) do not like to play nice.
  5. Do not use velcro or fashion tape to hold things together. Opt for snaps, hook-and-loops, or stitching instead.

Monday, July 21, 2014

Jax - Inner Tunic & Pants

Here are the foundation pieces for Jax's costume. For fabric information, see this post. (Sorry about the bad lighting in the picture.)

Step one was taking good measurements of his length (from "neck bump" down), shoulders, chest, waist, hips, neck to shoulder, neck to fingertips, and shoulder to fingertips.


Pants

I started with the pants. I used the pattern Simplicity 3935 with no alterations. It turned out great except that I have the worst time getting the elastic for the waist band the right length. I always worry about it being too tight and make it too loose. This is something I need to work on. Anyway, I am also planning on adding stirrups later on to keep the pant cuff from coming out of his shoes.


Inner Tunic

The inner tunic took a little more work. I used the same pattern as a basis, but even the XS size is too large for Jax. I laid out the pattern pieces for the shirt front and started tracing, measuring and marking on tissue paper.

(click to enlarge)

I lined up the two pieces for the front sections, traced the armseye and angle for the side seam and shoulder seam. Then I referred to Jax's measurements and measured out the length of the side seam and shoulder. (Remember your seam allowances!) Next I traced the angle of the neck from the pattern, but redrew the lines until it looked how I thought it should go. A 6"x24" quilting ruler was very helpful in drawing those straight lines. Hopefully you can see from this picture how I drew and redrew the lines until it looked right.

I mostly used the back and sleeve patterns as is. The only adjustment was shortening the shoulder length so that it matched the front pattern, and shortening the sleeve to match Jax's measurements (with hem allowance).

I deviated from the pattern when adding what I am calling the facing (the strip of fabric around the collar and the open edges in the front). I cut two 4" wide strips on the bias and sewed them end-to-end so that I had one really long strip. I cut it on the bias since bias cut fabrics love curves. They like to bend and conform unlike straight cut strips of fabric. I pressed the strip in half with wrong sides together. I sewed the raw edge of the strip to the raw edge of the body of the tunic. I also topstitched along the back of the neck, between the shoulder seams, 1/8" below the seam between the tunic body and the facing to encourage the facing to stand up.

(click to enlarge)

I closed the front with a long strip of velcro. I have since talked to members of the Rebel Legion and they recommended staying away from velcro. Apparently it doesn't hold up well at over long periods of time and is a huge hassle to wash. In the future I would use snaps or buttons.

What I learned:
  1. Use snaps instead of velcro.
  2. Do not ignore others' advice about making a mock-up first. (Though I think it will take a long time for this lesson to sink in.)
  3. I need to learn to to get facing strips to lie flat.
  4. For children's costumes, use a crew neck T-shirt for the inner tunic instead of sewing one.
  5. I need to work on getting waistband elastic length just right so that it is nice and snug.

Wednesday, July 16, 2014

Jax - Fabrics

I went down to JoAnn one Saturday and bought all the material for Jax's costume. All of the cotton/Sew Classic fabrics were on sale, which was perfect. Yardage will depend on your measurements. For best results, make your pattern pieces, lay them out, and from there measure how much you will need. Be sure to add some extra because you never know how much it will shrink in the wash. Always prewash your fabrics for anything you intend to use more than once!

Sew Classic Linen Tissue Fabric

Color: Tobacco
Width: 54 inches
Content: 60% linen, 40% cotton
Care: Machine wash cool delicate, No chlorine bleach or Fabric softener, Tumble dry low, Cool iron
Source: JoAnn (link)

Use: Inner tunic, pants


Sew Classic Specialty Cotton Gauze Fabric Solid

Color: Potting Soil
Width: 44 inches
Content: 100% cotton
Care: Machine wash cool delicate, No chlorine bleach or Fabric softener, Tumble dry low, Cool iron
Source: JoAnn (link)

Use: Outer tunic, obi

Costume Pleather (Textured Pleather)

Color:  Black
Width:  54 inches
Content: 100% polyester
Care: Handwash sperately
Source: JoAnn

Use: Tabards, belt, shoe covers

Sew Classics Suiting Dapple Fabric

Color:  Potting Soil
Width:  56 inches
Content: 100% poly filament
Care: Machine wash cool delicate, No chlorine bleach, Fabric softener, Tumble dry low, Cool iron
Source: JoAnn (link)

Use: Robe

Tuesday, July 15, 2014

Jax - Design

I decided to start with the boys' costumes. (Purely selfish of me, starting with theirs as practice before working on mine and Dash's. But ours will be worn longer and appreciated more, so I don't feel bad about it.) Jax's is first.

He requested Anakin Skywalker's outfit from Clone Wars. I told him that I did not want to could not make the armored collar and shoulder pads like he sports in seasons 1-3. 


But I was willing to do something like his look from seasons 4-6 with some Attack of the Clones influence.


The parts of his costume will be:
  • medium brown inner tunic
  • medium brown pants
  • dark brown outer tunic
  • black faux leather tabards
  • dark brown obi
  • black faux leather belt
  • mottled brown robe
  • black faux leather shoe covers

Yes, I agree that shoe covers are lame, but I am not shelling out the cash for boots when his feet are just going to grow. :)